My boyfriend requested that I make his co-worker a birthday cake. No sweat right? Well he asked me if I could make a Dilbert cake. I did really well in art class in middle and high school… but the thought of free-handing a Dilbert on a cake made me a little nervous – being the perfectionist that I am. So I decided to try a buttercream transfer. A buttercream transfer is one in which the cake decorator takes an mirror image of what they want on the cake, places a piece of wax paper over it and uses it as a guide to create the same image with buttercream. One then freezes it which allows you to take it off the paper and flip it onto the cake!
Piece of cake right? Well… you have to be very careful. I did a little research and this is a great site for a BT tutorial. The thing you have to keep in mind is that what you will see on the cake is on the OTHER side, not the side you are working on. In other words, the bottom becomes the top and vice-versa. So it is important to choose the order in which you pipe the colors wisely. In my case, it was important to complete the black outline first.. then to fill in the various colors.
I also decided to try another shortcut I’d seen on one of my food blogs… I’m not sure if you’ve ever tried to put a layer cake together, but when I first started out, I found it difficult to keep it from looking like the tower of pizacake. I obviously mastered it, but for any non-cake decorator, here is an easy tip! The only thing you really need is for your pan to be at least 3” tall. Most cake pans are only 2” tall.
Bake your cake. Layer them as you wish. After all of the layers are cooled, I wrap them individually in plastic wrap and place them on a flat surface in the freezer so they are easier to handle and less likely to crack in half. Line your 3” pan that you used to bake the cakes (make sure it is clean of course) with plastic wrap. You want excess to hang over the pan just in case. Place the first layer in the pan, with the flattest side down. This will become the top of the cake! Using the frosting that you are going to cover the cake with, create a dam around the perimeter. This is so that the yummy filling won’t ooze out the sides when you are stacking the layers.

Now, spread your filling of choice evenly and place the second layer in. Be careful not to over-fill it because then, the weight of the layers will make the filling ooze out past the dam you’ve created. So you want to make sure that the filling is even with the dam.

If this is your final/bottom layer, then it is important for the flattest side to be facing up. If it is the middle layer, then it doesn’t really matter.

Create a dam and spread out the filling as you did before. then add the last layer (or another layer depending in how many you are doing) with the flat side up. This isn’t very effective if you are doing a 6 layer cake because the first half will be guarenteeably straighter then the second. So I would suggest 3 layers max for this little short cut and a pan with 3” sides.


Flip it over onto a turn table, slowly remove the pan and the plastic wrap and admire your perfectly straight cake! I didn’t take a picture of this step because I was too eager to frostit and see how my buttercream transfer turned out… so here is the finished cake! (Let’s hope Dan doesn’t read my blog today…)
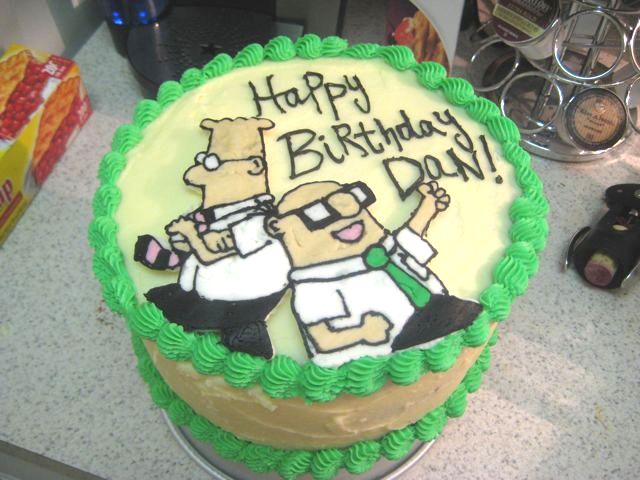
One little thing that I would do next time is to be more careful if you make a mistake while piping the transfer… I started with Dilbert’s head and had to wipe off part of it and start over. It looks like I didn’t wipe it well enough because his head has some small black smears, but it still looks fantastic!
Happy Caking!
